

You know that gut-wrenching feeling when you miss the shot? The winning goal. The perfect dunk. That split-second expression of pure victory. I’ve been there countless times, and honestly, it sucks.
Sport photography isn’t just about having an expensive camera. It’s about anticipation, lightning-fast reflexes, and knowing exactly which settings work when a soccer player is sprinting at 20 mph toward your lens.
After shooting everything from high school basketball to professional motorsports, I’ve learned what separates amateur snapshots from portfolio-worthy action shots. This cheat sheet distills years of trial, error, and thousands of frames into practical techniques you can use at your next game.
Essential Camera Settings for Different Sports
Shutter Speed: Your Make-or-Break Setting
Fast-moving sports demand faster shutter speeds. Period. For most action photography, you’re looking at 1/500th of a second minimum. But let’s break this down by sport type.
Indoor basketball or volleyball? Bump it to 1/640th or 1/800th. The artificial lighting and rapid directional changes require this speed to freeze motion without blur. Football and soccer players running at full speed? Go for 1/1000th second minimum.
Here’s something most beginners don’t realize: motorsports actually need speeds around 1/2000th to 1/4000th second. At 200 mph, even 1/1000th can produce motion blur.
Aperture Settings That Actually Work
Wide apertures (f/2.8 to f/4) create that gorgeous background blur while keeping your athlete sharp. This separation makes subjects pop against busy bleachers or crowded sidelines.
Outdoor daytime events give you flexibility. You can shoot at f/5.6 or f/8 and still maintain fast shutter speeds. Indoor venues with poor lighting? Open that aperture as wide as your lens allows. An f/2.8 lens becomes invaluable when shooting under those awful gymnasium lights.
ISO: Managing the Noise Trade-Off
Modern cameras handle high ISO remarkably well. Don’t fear bumping it to 3200 or even 6400 for indoor sports. A slightly noisy sharp image beats a perfectly clean blurry one every single time.
Start with ISO 400-800 for bright outdoor conditions. Indoor evening games might push you to ISO 1600-3200. Arena sports with decent lighting typically need ISO 1600-2500.
Autofocus Modes and Techniques
Continuous Autofocus Is Your Best Friend
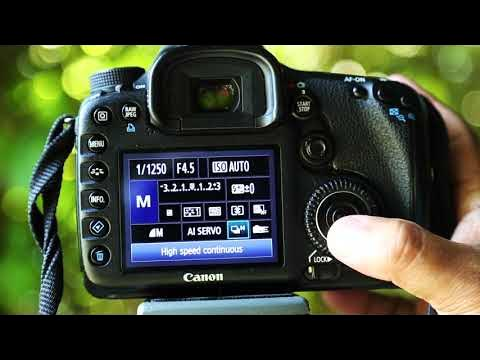
Switch to continuous autofocus mode (AI Servo for Canon, AF-C for Nikon/Sony). This mode tracks moving subjects continuously, adjusting focus as athletes move toward or away from you.
Single-point focus works beautifully for predictable action. Think free throw shots, penalty kicks, or starting line sprints. You know where the action happens, so plant your focus point there.
For unpredictable sports like soccer or hockey, zone or dynamic area focusing helps. Your camera tracks subjects across multiple focus points as they move through the frame.
Back-Button Focus: A Game Changer
Separating focus from your shutter button gives you incredible control. Assign autofocus to a button on your camera’s back (usually AF-ON). Hold it to focus, release to lock focus, shoot whenever you want.
This technique prevents that frustrating focus hunting when you’re tracking a player through a crowd. Your focus stays locked on your subject even when you’re not shooting.
Composition Strategies That Elevate Your Images
The Rule of Thirds Still Matters
Position your athlete along those imaginary grid lines rather than dead center. Place their eyes on the upper third line. Leave space in the direction they’re moving or looking—this creates visual tension and story.
Tight crops emphasize emotion and intensity. A basketball player’s determined face, sweat dripping, muscles straining—that tells a story. Wide shots capture context: the packed stadium, teammates celebrating, the scoreboard showing the winning point.
Anticipation Beats Reaction
Great sport photographers shoot what’s about to happen, not what just happened. Watch the game flow. Where’s the ball going? Who’s positioning for the next play?
Position yourself where action converges. Behind the goal in soccer. Baseline in basketball. Turn one in motorsports. These spots give you head-on or dynamic angle shots that magazines love.
READ MORE: Lexus IS F Sport 500 Trunk Spoiler
Equipment Essentials Beyond the Camera Body
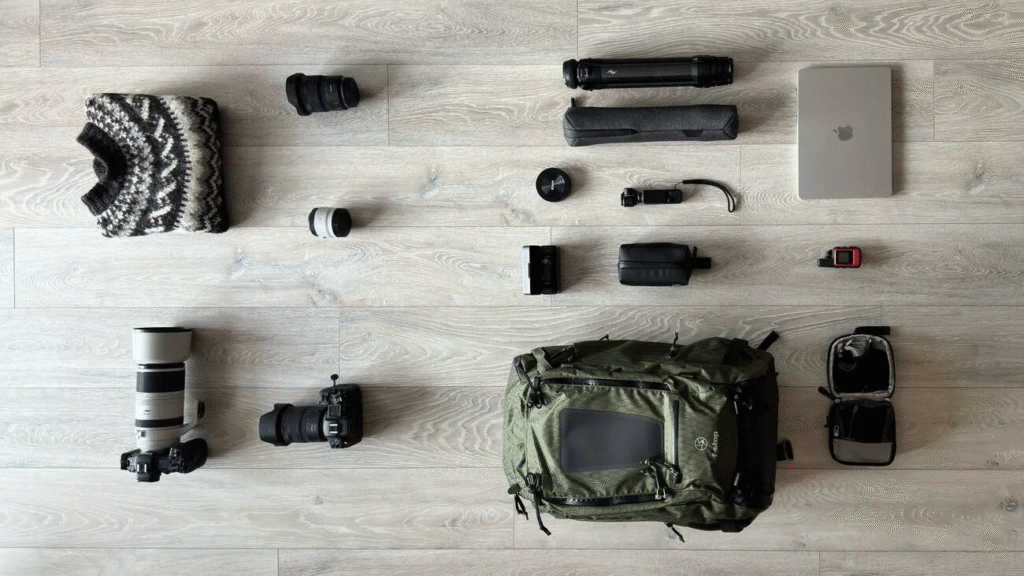
Telephoto Lenses Are Non-Negotiable
A 70-200mm f/2.8 lens is the sport photography workhorse. It covers most situations from courtside to field-level. For larger venues, consider 300mm or 400mm focal lengths.
Budget tight? Look at f/4 versions or third-party options from Sigma or Tamron. They’re significantly cheaper while delivering sharp results.
Monopods Save Your Arms and Your Shots
Holding a heavy telephoto lens for three hours straight is brutal. A monopod provides stability without the bulk of a tripod. You maintain mobility while reducing camera shake and fatigue.
Many venues ban tripods anyway, but monopods usually get approval. They’re quick to reposition when action shifts, unlike tripods that require constant adjustments.
Sport-Specific Quick Reference
Basketball: 1/640s minimum, ISO 1600-3200, f/2.8-4, shoot from baseline corners or under the basket
Football: 1/1000s, ISO 400-800 (day), f/4-5.6, position behind end zones or sidelines at 10-yard line
Soccer: 1/800s minimum, ISO 400-1600, f/4, shoot from behind goals or midfield elevated position
Baseball: 1/1000s, ISO 400-800, f/4-5.6, position at first or third base for action at home plate
Swimming: 1/1000s minimum, ISO 800-1600, f/2.8-4, shoot from pool ends or elevated side angles
Common Mistakes That Kill Your Shots
Shooting in single-shot mode is mistake number one. Burst mode (continuous shooting) captures sequences—use it. That perfect peak action moment happens between frames in single-shot mode.
Forgetting to adjust white balance creates color casts from stadium lighting. Shoot RAW format so you can fix this in post-processing, but getting it close in-camera saves editing time.
Standing in the same spot all game limits your portfolio. Move around. Different angles tell different stories. Low angles make athletes look powerful. High angles show field strategy and spacing.
Post-Processing Tips for Action Shots
Crop strategically in editing. Remove distracting elements while maintaining resolution. Straighten horizons—tilted images look amateur unless tilt adds dynamic energy intentionally.
Boost clarity and sharpness moderately. Sport images should look crisp, but over-sharpening creates ugly halos around subjects. Adjust shadows and highlights to recover details in bright jerseys or dark backgrounds.
Noise reduction helps high-ISO images, but don’t eliminate all grain. Some texture maintains that authentic action photography feel.
FAQs
What’s the best camera for sport photography?
Any camera with fast autofocus, good high-ISO performance, and 8+ fps burst rate works. Full-frame cameras like Canon EOS R6, Nikon Z6 III, or Sony A7 IV excel, but crop sensors like Canon 90D or Nikon Z50 deliver excellent results at lower prices.
Can I shoot sports with a kit lens?
For practice, yes. But kit lenses limit you severely with narrow maximum apertures (f/3.5-5.6). You’ll struggle in indoor venues and won’t achieve that professional background blur. Invest in faster glass when possible.
How do I get field access for better shots?
Start by shooting local high school or college games. Contact athletic directors for media credentials. Build a portfolio, then approach professional teams with your work. Many teams grant photo access to credentialed journalists or photographers.